Setup
For Windows, Mac and iOS ready-to-use Visual Studio and Xcode projects are provided in the download section.
If another IDE should be used or the Basic Render is integrated into an existing project, this guide offers instructions on how to setup the framework on desktop systems as well as iOS.
Desktop Systems
If we are on Windows or Mac, we can use the external libraries provided as part of the project from the download section. On Linux we first need to compile some of the libraries
(GLFW, GLEW and FreeImage are only available as dynamic libraries for Windows and OS X) to be able to include them in our project or we can directly use their source code.
Please refer to the documentation of the respective libraries to integrate them into your project:
As soon as we have compiled versions of the external libraries or alternatively their source code, we can get started by creating a project in our favorite IDE and set the paths to the headers of all the libraries we need.
The following list is based on Visual Studio and the folder "externalLibraries" in our solution directory. On OS X replace "$(SolutionDir)" with "$(SRCROOT)" and use slashes instead of backslashes.
- $(SolutionDir)\externalLibraries\vmmlib-library
- $(SolutionDir)\externalLibraries\boost-library
- $(SolutionDir)\externalLibraries\glew-1.13.0\include
- $(SolutionDir)\externalLibraries\FreeImage3170
- $(SolutionDir)\externalLibraries\glfw-3.1.1\include
- $(SolutionDir)\externalLibraries\freetype-2.6\include
- $(SolutionDir)\bRenderer
Next we need to include the compiled dynamic (and static) libraries. In Visual Studio we need to define their directories first (the list is again based on the folder "externalLibraries"):
- $(SolutionDir)\externalLibraries\glew-1.13.0\lib_win32
- $(SolutionDir)\externalLibraries\FreeImage3170
- $(SolutionDir)\externalLibraries\glfw-3.1.1\lib_win32
Now we can define the additional dependencies in Visual Studio:
- opengl32.lib
- glew32.lib
- glfw3dll.lib
- FreeImage.lib
Or we can do the same in Xcode in the "Link Binary With Libraries" section:
- OpenGL.framework
- libGLEW.1.13.0.dylib
- libglfw.3.1.dylib
- libfreeimage.a
Finally we need to define a few preprocessor macros, which depend on whether we build the FreeType library or include the source code directly.
If we include its source code, we define "FT2_BUILD_LIBRARY" on all systems, otherwise on Mac and iOS no macros are needed.
In Visual Studio some libraries could cause warnings (e.g. the vmmlib), we therefore define the following macros:
- FT2_BUILD_LIBRARY
- _CRT_NONSTDC_NO_DEPRECATE
- _CRT_SECURE_NO_WARNINGS
- _SCL_SECURE_NO_WARNINGS
In Xcode we only need two macros (both for FreeType) yet it is important to remove the "DEBUG" macro as it may cause problems with FreeType:
- FT2_BUILD_LIBRARY
- DARWIN_NO_CARBON
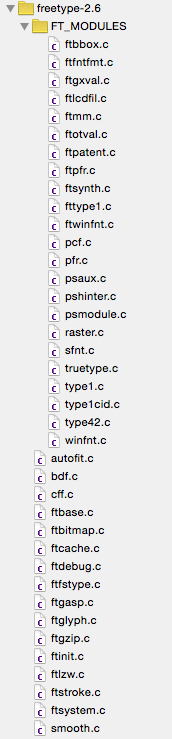
For FreeType not all source files need to be integrated into the project. Click here for a list of files to include.
Now we are all set and can include the "bRenderer" folder into our project, which contains all headers and sources we need to start using the framework.
To access all the renderer's functionality, we include bRenderer.h:
iOS
On iOS we can use built-in libraries provided by Apple. We therefore don't need FreeImage, GLEW and GLFW. This reduces the list of header search paths to:
- $(SRCROOT)/externalLibraries/vmmlib-library
- $(SRCROOT)/externalLibraries/boost-library
- $(SRCROOT)/externalLibraries/freetype-2.6/include
- $(SRCROOT)/bRenderer
Next we include the following libraries in the "Link Binary With Libraries" section:
- CoreMotion.framework
- QuartzCore.framework
- CoreGraphics.framework
- UIKit.framework
- Foundation.framework
- OpenGLES.framework
For FreeType we need two preprocessor macros and make sure to remove the "DEBUG" macro.
- FT2_BUILD_LIBRARY
- DARWIN_NO_CARBON
For FreeType not all source files need to be integrated into the project. Click here for a list of files to include.
As a final step we now drag the "bRenderer" folder into our Xcode project, which contains all headers and sources we need to start using the framework.
To access all the renderer's functionality, we include bRenderer.h:

